

Buy ProductsDistributors     |
Kickstarter Backer Alert with Stats Scroller, using Arduino Yun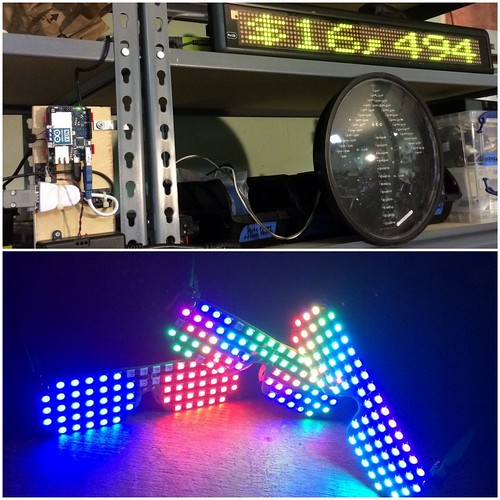 The Arduino Yún is a curious addition to the Arduino family. There is a fairly widespread community surrounding the Arduino concept, platform and software. There's another popular community dedicated to hacking and improving inexpensive wireless routers, which often run Linux. The Yún combines the two...it's basically an Arduino Leonardo housed on the same PCB as an Atheros AR9331 wireless router (commonly found in TP-Link and other popular hackable routers). They're connected through a serial port and run independently, but the Linino team has developed a few ways to make them team up on some tasks.
Recently, we created our first Kickstarter campaign (RGB LED Shades). It's very exciting to see the "New Backer Alert!" emails roll in, and the notifications pop up on a smartphone. But we wanted to see our Kickstarter stats at a glance, and be notified whenever we have a new backer. The Linux side of the Yún can run scripting languages such as Python to scrape website data and control an LED marquee sign, and the Arduino side can control some I/O for an impossible-to-ignore new backer alert. Read the full Instructable here: http://www.instructables.com/id/Kickstarter-Backer-Alert-with-Stats-Scroller-using/ Submitted by Garrett on Tue, 10/14/2014 - 14:52. RGB LED Shades Kickstarter LaunchedAfter a lot of work and frustration, we've finally launched the RGB LED Shades on Kickstarter! "We're excited to announce our newest piece of wearable electronics: RGB LED Shades! They're colorful, bright, hackable, and the pinnacle of conversation-starting technology. A fun way to learn programming and electronics, yet just as entertaining for experienced tinkerers. But if you need a stunning fashion accessory without writing code, they're pre-loaded with dazzling patterns out of the box!" Submitted by Garrett on Thu, 09/25/2014 - 17:29. Deep discounts on ShiftBrites and MegaBrites!We've put ShiftBrites, Headerless ShiftBrites, and MegaBrite 90's on sale: ShiftBrite 2.0 Headerless ShiftBrite 2.0 Submitted by Garrett on Tue, 07/22/2014 - 10:15. 240 Pixel WS2812 ArrayMy friend Scott randomly dropped by the macetech LLC lab up here in Pullman, WA. He brought a cool thing to show off...a big array of 60px/m RGB pixels using the WS2812 LEDs. It's very bright in person and I was impressed with the matchup of the 60px/m LED spacing and the fluorescent lighting louver grid. I've definitely used the grid in a lot of projects, but never made that connection! His controller uses a custom WS2812 library running on a Digilent chipKIT Max32 with plenty of CPU power to spare.
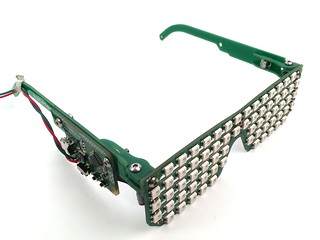
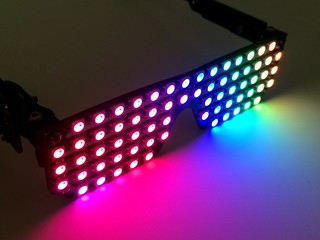
Submitted by Garrett on Sat, 07/19/2014 - 00:11. Hacking the RGB ShadesWe've got a new article over on Makezine today, showing how I added an audio-detection circuit to both the RGB Shades and the LED Matrix Shades. The result was REALLY cool and finally used the extra pins I'd made available on both designs. Audio detection is just the beginning...I have a few more ideas for sensors to add to LED Shades, and it would be great to see your suggestions. They might make it into another video! Anyway, head on over the Makezine to see the full article: Hacking the Macetech RGB Shades Submitted by Garrett on Fri, 07/18/2014 - 23:15. LED Shades V0.1 Open SourcedBack in 2012, in the few weeks preceding Maker Faire Bay Area, I was excited about a new secret project. We had the macetech LED Lounge again, but this was a way to take the party with you. Wearable LED slotted shades with a built-in Arduino-compatible controller!  They were a huge hit, both at Maker Faire Bay Area and Maker Faire New York. It was impossible to walk down the street in Manhattan without getting comments and questions every few seconds.  However, the first LED Shades were nothing more than prototypes. They were hurriedly designed. Didn't have much resolution, didn't have folding hinges or cables with connectors, the battery was taped onto the side, and so on. The biggest problem was one that didn't show up for months, but claimed all but one of our prototypes (which still works to this day). The problem was that the LED driver ICs along the top edge of the PCB would crack internally due to flexing stress while being worn.
Submitted by Garrett on Wed, 07/02/2014 - 23:12. LED Matrix Shades Have Arrived!A quick introduction: LED Matrix Shades are a very cool piece of wearable technology that integrates a fully hackable Arduino-compatible processor with an LED matrix you can see through. They are the ultimate attention grabber at social events, and inspires curiosity among technology enthusiasts of all ages. Every function can be reprogrammed by the user, and there are even places to solder your own circuits and sensors. Submitted by Garrett on Sun, 06/29/2014 - 00:56. Maker Faire 2014 and RGB ShadesKickstarter for RGB Shades: https://www.kickstarter.com/projects/macetech/rgb-led-shades
The big event of the maker movement, O’Reilly Bowl *cough* I mean Maker Faire Bay Area 2014, happened last weekend (May 17th and 18th). As with most words used to describe Maker Faire, “happened” is a little insufficient. It’s a tremendous and complicated event that requires a massive effort from everyone involved…the O’Reilly Maker Faire team, the Maker Shed, the sponsors, the performers, the speakers, the exhibitors, and the event staff. And one more group that I didn’t fully appreciate until this year…the attendees (let’s call them participants). This was the first year at Maker Faire Bay Area that I was not an exhibitor, and instead wandered the exhibits and crowds. It was amazing and exhausting, just as much as if I’d been running an exhibit table. Submitted by Garrett on Mon, 05/26/2014 - 14:53. WowWee MiP Quick TeardownThe WowWee MiP ("mobile inverted pendulum") robot is the first of its kind on the mass market. It's a toy robot that does what most other toy robots do: it rolls around your living room floor, making squawks and beeps and bumping into things, and being really cute in general. However, the MiP does it with style. The mechanical design is not inherently stable. If the MiP is turned off, it will not stand upright on its own wheels (a handy stand is provided for display). Instead, an onboard sensor suite and powerful ARM Cortex processor keep it teetering upright just like any self-respecting science fiction robot (or slightly less self-respecting tourists on Segways). Researchers and hobbyists have been building devices like this for a number of years, but it's always exciting to see a niche technology make it to mainstream (much like the quadcopter boom in the past couple years). Robotics hobbyists pay close attention to the toy market, because a lot of technology can be hacked back into customized designs. Submitted by Garrett on Sun, 05/11/2014 - 00:03. Of course we 3D print, too!If you've attended a Maker Faire or Mini Maker Faire in the past few years, you've probably strolled past a table where someone seems to be tending to a jumble of wires and metal rods, and there's a whiff of molten plastic in the air. You might have stopped and watched as a plastic object appeared (slowly) and you might have been amazed (slowly) at the possibilities. You may have suspected this, but yes...we haven't been left behind, macetech has been 3D printing right along with the rest of the cool kids! My first 3D printer was built in 2011, after reading up about RepRap and finding an older cartesian assembly robot on eBay, made by Sony. It was huge and heavy, and I drove deep into the Santa Cruz mountains to pick it up from a barn crammed with an analog and relay computer collection. I purchased an extruder from MakerGear, and practically duct-taped it to the robot in order for it to print better mounting parts. The original control board was stuffed with FPGA's and a 486 processor, but I had to remove that and hack the stepper drivers to receive pulses from an Arduino Mega. It's been useful over the past few years, allowing us to create various brackets, adapters, holders, prototypes, and even parts of the LED Shades. Here it is today: Submitted by Garrett on Sat, 04/05/2014 - 22:54. |
Cool Links 
|


Recent Comments
5 years 2 weeks ago
5 years 2 weeks ago
5 years 4 weeks ago
5 years 11 weeks ago
5 years 18 weeks ago
5 years 19 weeks ago
5 years 23 weeks ago
5 years 23 weeks ago
5 years 26 weeks ago
5 years 32 weeks ago